Versions Compared

Key

  • This line was added.
  • This line was removed.
  • Formatting was changed.


Table of Contents

Introduction

The eKeeper fact-find can be used to gather your customer's details an information relevant to the application you are processing. You have the capability to edit the fact-find's structure i.e the questions you ask your customers. 

This guide will show you how to edit a fact-find structure so that you can add or edit pages, sections with your pages and questions within those sections. 


Expand
titleHow fact-finds are structured in eKeeper

Within eKeeper a fact-find is structured as follows:

When editing your fact-find structure the graphic will change to describe which part of the structure you are currently editing. For example the graphic below shows that we are currently editing the sections within a particular page. 

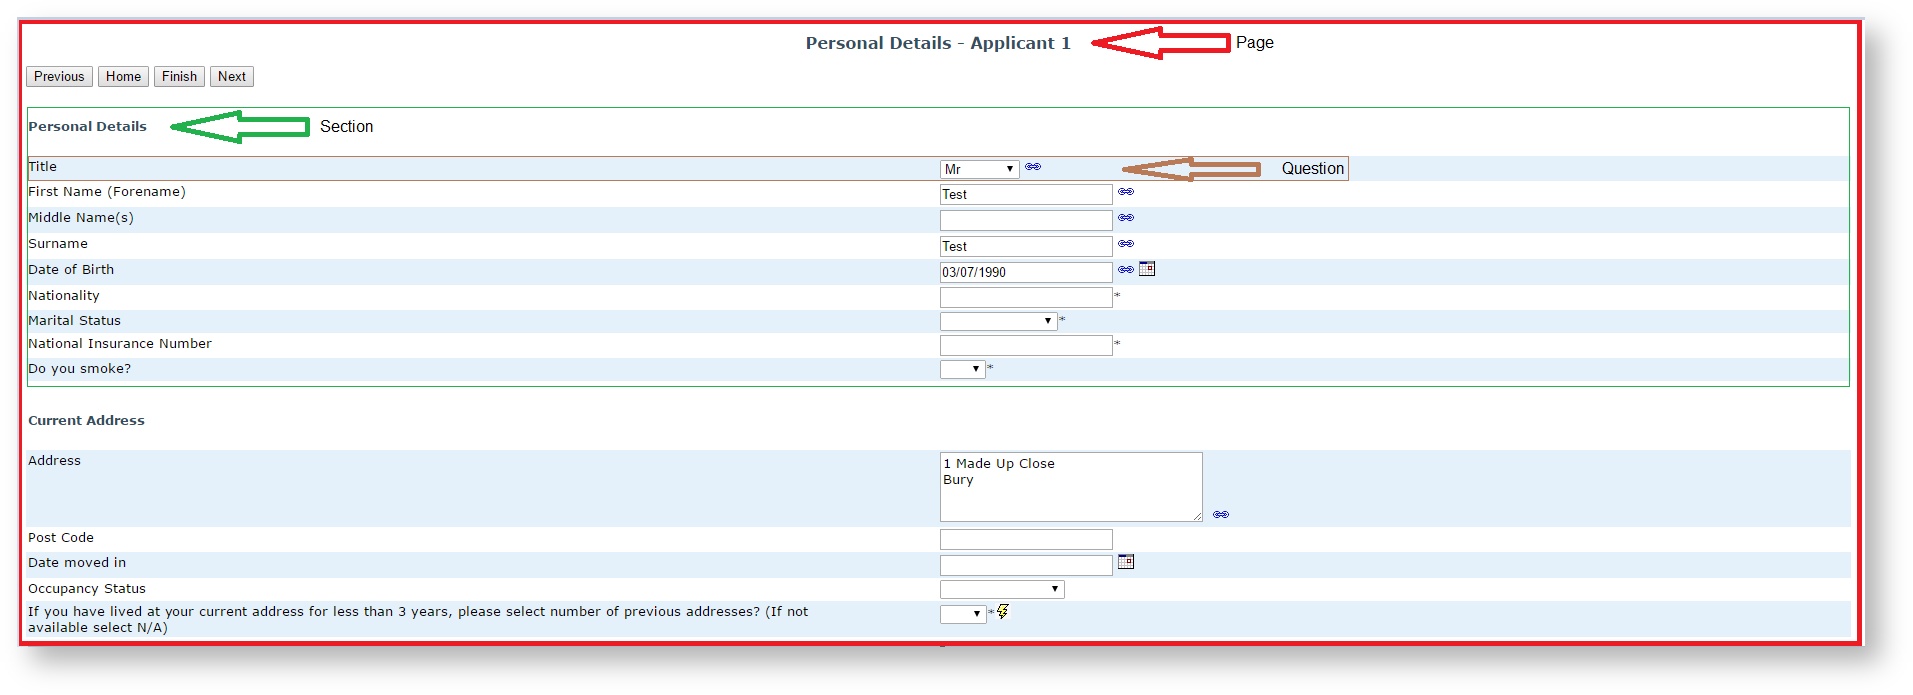
Example fact-find as viewed from a case

The following is an example of how the fact-find will look when accessing from a case, you can see that we have added arrows to indicate the difference between a page, section and question. (click the image to enlarge it)


Getting started

Since fact-finds are structures as pages/sections/questions, the first thing to do is create a page, you can then add a section to it and subsequently a section. 


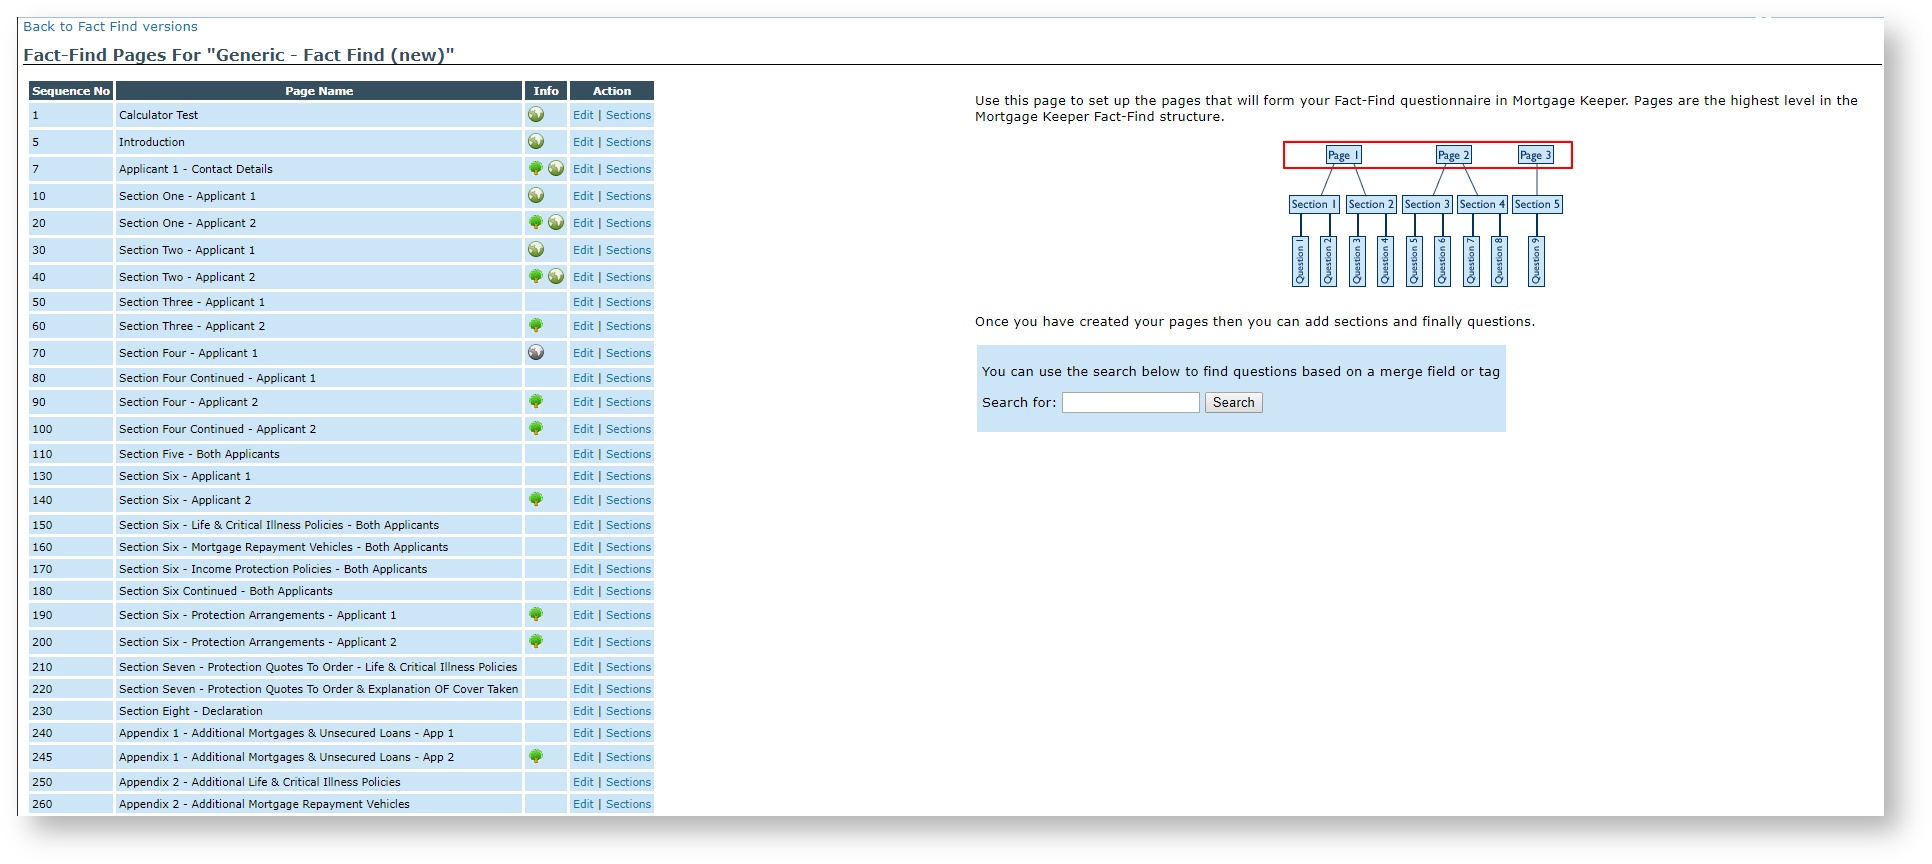
You can find the fact-find structures menu by heading to Maintenance > Fact-find Structure(s) > Edit Structure (Next to the relevant fact-find structure). You should then see a page similar to the below. This contains a list of the pages that are in the fact-find structure you have chosen to edit


Expand
titleCan't find your fact-find structures?

Finding the fact-find structures edit menu

eKeeper fact-finds are accessible from your cases, however to edit them we need to find the Maintenance edit menu. This subsection describes how you can find the fact-find structures maintenance menu.

  1. Login to your system


  2. From the home page click the 'Maintenance button'


  3. Once the maintenance page has loaded, find Fact-Find structure(s) link under the Customise your system section (to the left of the maintenance page)


  4. The next page displays the list of available fact-find structures currently loaded into your system

    This page has the following options
    • Edit - this allows you to change the name of the fact-find structure or make the fact-find unavailable
    • Edit Structure - This link takes you to the edit structure menu and will enable you to customise the fact-find further
    • Edit Fact-find Subsets - Fact-find subsets allow you to choose a set of pages from the chosen fact-find structure and group them together in a subset. The subset can be chosen when you are filling out the fact-find and will only display the desired pages in your subset. 
    • Set Prerequisites - Prerequisites will prevent a user from access the fact-find structure on their case unless a particular set of requirements have been fulfilled e.g. the IDD must have been completed or a life product must be written. 
    • Custom JavaScript - This can be used to place custom JavaScript code into the fact-find that is ran when the fact-find is opened.

      Info

      JavaScript should only be used if you have extensive experience using the JavaScript programming language.

      If you cannot see the 'Custom JavaScript' option please contact support@ekeepergroup.com


Choosing a fact-find structure to edit. 

Note
titleImportant

You can only complete the rest of this article if your user account has the permission to edit fact-find structures within eKeeper.

After you have completed the steps in the previous section, you now need to decide on which fact-find you wish to edit. Once you have decided click edit structure next to your chosen fact-find structure to begin editing

Tip
titleTip

To review the different fact-find structures, create a new case from the home screen. Once loaded click the 'enter fact-find' link at the top of the case.

You can then choose your desired fact-find structure using the displayed options.

Once you have chosen your fact-find structure you can switch to another using the 'change the fact-find structure for this case' option the appears to the right of the load


Creating new

Adding Pages to your Fact-Find

Pages

structure

To create begin creating a new fact-find page click the new link (see below) at the bottom of the page list screen (right)

Tip

You may wish to edit an existing page's details for example you may wish to change the name of a page or the order in which it displays. To do this simply click the edit link next to the desired page in the list. The options available to the page that follows are the same as those that display when you create a new page, so read on to find out more about the options available to you.


The next page (right) has a number of options which are described in detail at the link below:

Expand
titleClick here to learn more about the options available on the create fact-find page, screen


  • Page Title - This is the name of the page you are creating and will appear at the top whilst you fill out your fact-find
  • Sequence Number - Each page has a sequence number, which determines the order each page appears relative to each other. 
  • Page Applies to - Here you can set if this page applies to the 1st, 2nd, 3rd of 4th applicants. For example: pages set to the Applicant 4, will only appear if you have 4 applicants on your case. 
  • Copy page on creation of new case - Otherwise known as the 'copy case function', If you have an existing application that you wish to duplicate, you can choose which pages in your fact-find structure will have their answers copied to the new case.

    Tip
    titleTip

    When you copy a case you are effectively creating a new application and pulling some information from the original case to the new one. Some information that will pull across includes values that you have entered into the fact-find. When copying the case, it is important to note that all of the fact-find structure will still be available on the new case, however this function will copy only the answers of the pages you have chosen.

    A scenario where you might use this would be to copy personal information to the new case's fact-find as this information is not likely to change. Where as pages containing information about the Application itself are likely to be different from one application to another, so you would want to exclude these from copying to the new case.


  • Page Type -  Here you can set the type of page you are looking to create: Normal, calculator or calculator with annual totals
    • Normal - These are general pages in which you can include text fields, dropdown boxes, check boxes etc.
    • Calculator - These pages come with a summary section included. you can then add incomes and expenditure sections. The summary field will automatically calculate the difference between the incomes and expenditure totals for each section. 
    • Calculator with Annual Totals - This is the same as the calculator type pages, however with the addition of a 12 month total.
  • Copy page From - This enables you to copy the sections and question fields from a page that you have already created. This is useful if you have already created a page that applies to applicant 1 and want to create an identical page, but for applicant 2.
  • Administrator only - Only users that have the permission to access 'administrator only pages' are able to view pages set as administrator only
  • Anchor
    SyncWithPortal
    SyncWithPortal
    Synchronise with customer login - This will make the fact-find page you are creating available to your customer/introducer portal system. 

    Info
    titleNote

    The portal is available as an add on to the eKeeper CRM, please contact support@ekeepergroup.com for more information.


  • Only Enter Values on this page when - This allows you to decide on when this page will be visible to your users based on a question earlier in the fact-find. For example you may have question on the first page of your fact-find that states "Is this a joint or a single application" and in this scenario you may only want this page to display if it is a joint application, you can use this function to achieve this. 


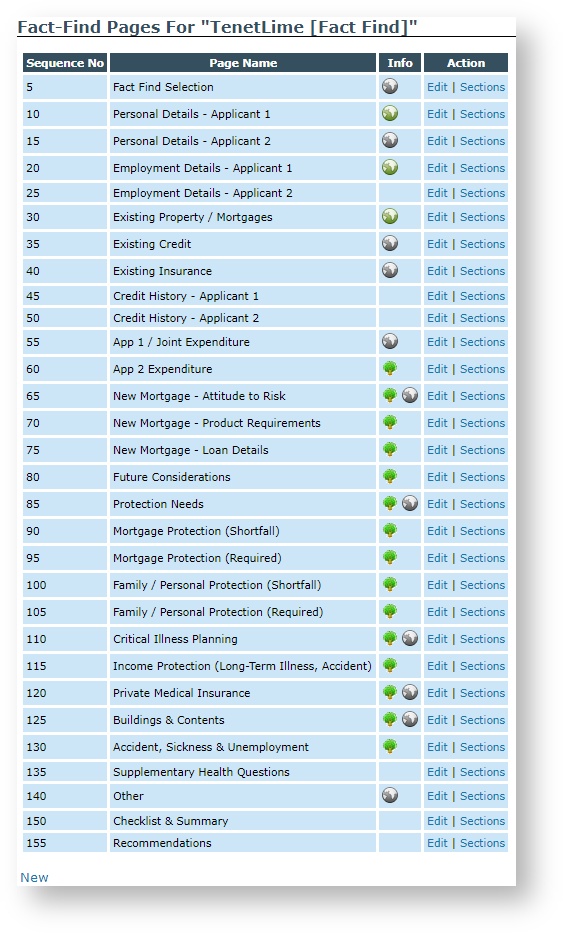
Once you have made your selections click Submit to save your changes, you will then be returned to the page list (right)


Adding Sections to your Fact-find Pages

Now that you have created a page, you are likely to want to add some content to the page. We can do this by adding sections and then questions. 

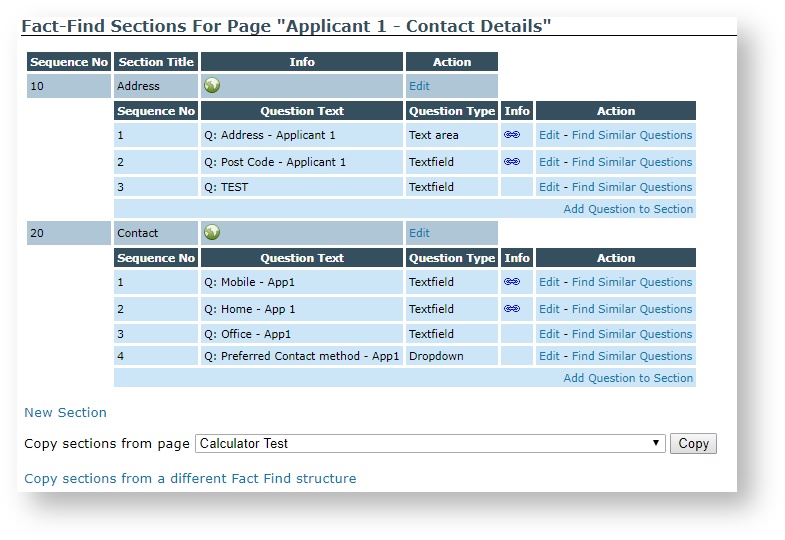
To add a section first find the desired page in the page list and click Sections on the right hand side (see below) to open the page so that you can begin adding sections to it


The next page shows a list of sections that already exist on the page you have opened.

To add a new section to the page click New Section, which appears at the bottom of the existing list of sections.

Tip

You can also copy all of the sections from another page using the drop down option and then pressing copy (see below)


There are a number of options available on the next page (see right). These are descibed in detail in the expandable link below.

Expand
titleClick here to learn more about the options available on the create a new section page
  • Section Title - here you can add the name of the section you are adding. Note that this will be visible when filling out your fact-find.
  • Sequence No - This determines the order in which this section will appear amongst the other sections on the current page.
  • Initially hidden - select this if you wish this section to be initially hidden when the page loads
  • Synchronise with Customer Login - If you have the portal on your package* you can set this page to be available to your customers when they login to their portal account

*Additional purchase necessary

Once you have made your selections click the Submit button to continue. 


Adding Questions to your fact-find Sections

Now that you know how to add a section to your fact-find, you may wish to add a question to the section. Remember questions are the fields that your user's will fill out whilst navigating through the fact-find. 


To Begin adding a fact-find quesiton click the Add Question to this Section link to the bottom right of the desired section (see right)


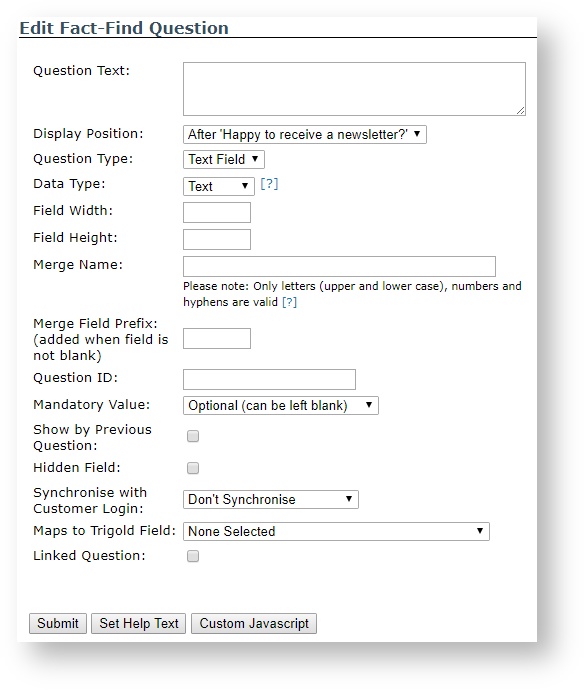
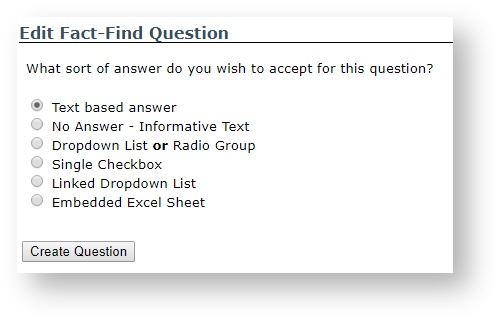
You will now see a list of options (right). Each of these options are described in detail below:

Expand
titleClick here to learn more about types of fact-find question


Type of questionDescriptionExample

Text Based Answer

A free text entry field

No Answer Informative TextA piece of text (highlighted in red to the right), used to inform your user of something

Dropdown or Radio Group

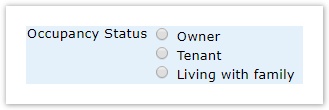
A question that provides your users with some options

Dropdown:

Radio Group:

Single Check BoxAn on/off question which allows your user to check applicable as required

Linked Dropdown FieldA multi-option question. The options within this field are linked to another dropdown field else where in the system (you can define this).

Info

The answer to this example question will update if the user updates the Title field against the applicant. e.g. changing from Miss to Mrs will update in each location if you update one of the fields.


Below are some expandable links that describe how you can configure each question type

Expand
titleText Field


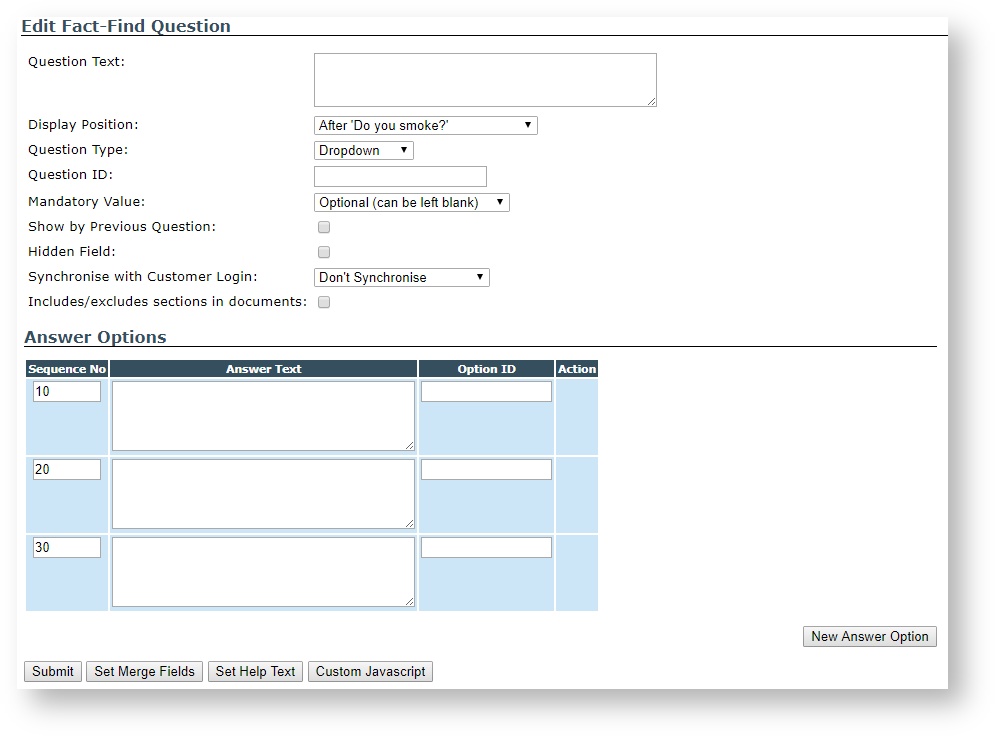
Section


Column
  • Question Text - This is the title of the question e.g. "How many dependants do you have?"
  • Display position - determines the order in which this question appears amongst the other questions in the current section
  • Question Type - There are two options here
        • Text Field - Looks like this:
        • Text Area - Looks like this:
  • Data Type - There are three options here:
        • Text - Allows free text entry into the field:
        • Number - restricts entry to numbers only:
        • Date - Restricts entry to date entries only
  • Field Width - Adjust and specify the width of the field by character widths (leave blank for the default)
  • Field Height - Adjust and specify the height of the field by character heights (leave blank for the default)
  • Merge Name - A unique placeholder for the answer to this question. A merge field can be placed into a document template, so that the answer to this question can be pulled into your letter when you produce it against a case
  • Merge field prefix - When producing a document with the above merge field placeholder you can choose to include a prefix e.g. a £-sign if this question is used to obtain a monetary value
  • Question ID - An identifier that maps this question to another question. The question ID is used to swap answers between two questions if the order of the applicants is changed i.e. applicant 1 is swapped with applicant 2, this will then swap any matching field answers using the question ID.
  • Mandatory Value - specify here if you want to make this field mandatory
  • Show by Previous question - specifies if this question should appear on the same line as the question that precedes it:
  • Hidden Field - Enable this question to be hidden when the fact-find page loads
  • Synchronise with customer login - If you have the customer portal on your package*, then you can enable this question so that it will be visible to your customers when they log in to their portal profile
  • Maps to Trigold Field - Here you can choose to map your new question to a relevant field in the trigold sourcing software (desktop version only), values entered into this question can then be pulled out into trigold when you perform a source through MortgageKeeper. Simply select the field that this question maps to in trigold to map it.
  • Linked Question - checking this on will enable you to map this question to another field in your system for example you could link to the forename of applicant 1 in which case if you updated the 1st Applicants first name, then this question would update to match and vice versa. See below for an example of a question mapped to the APR field in the mortgage panel on the case.

*Additional Purchase necessary


Column
width60%


Expand
titleNo Answer Informative Text


Section


Column
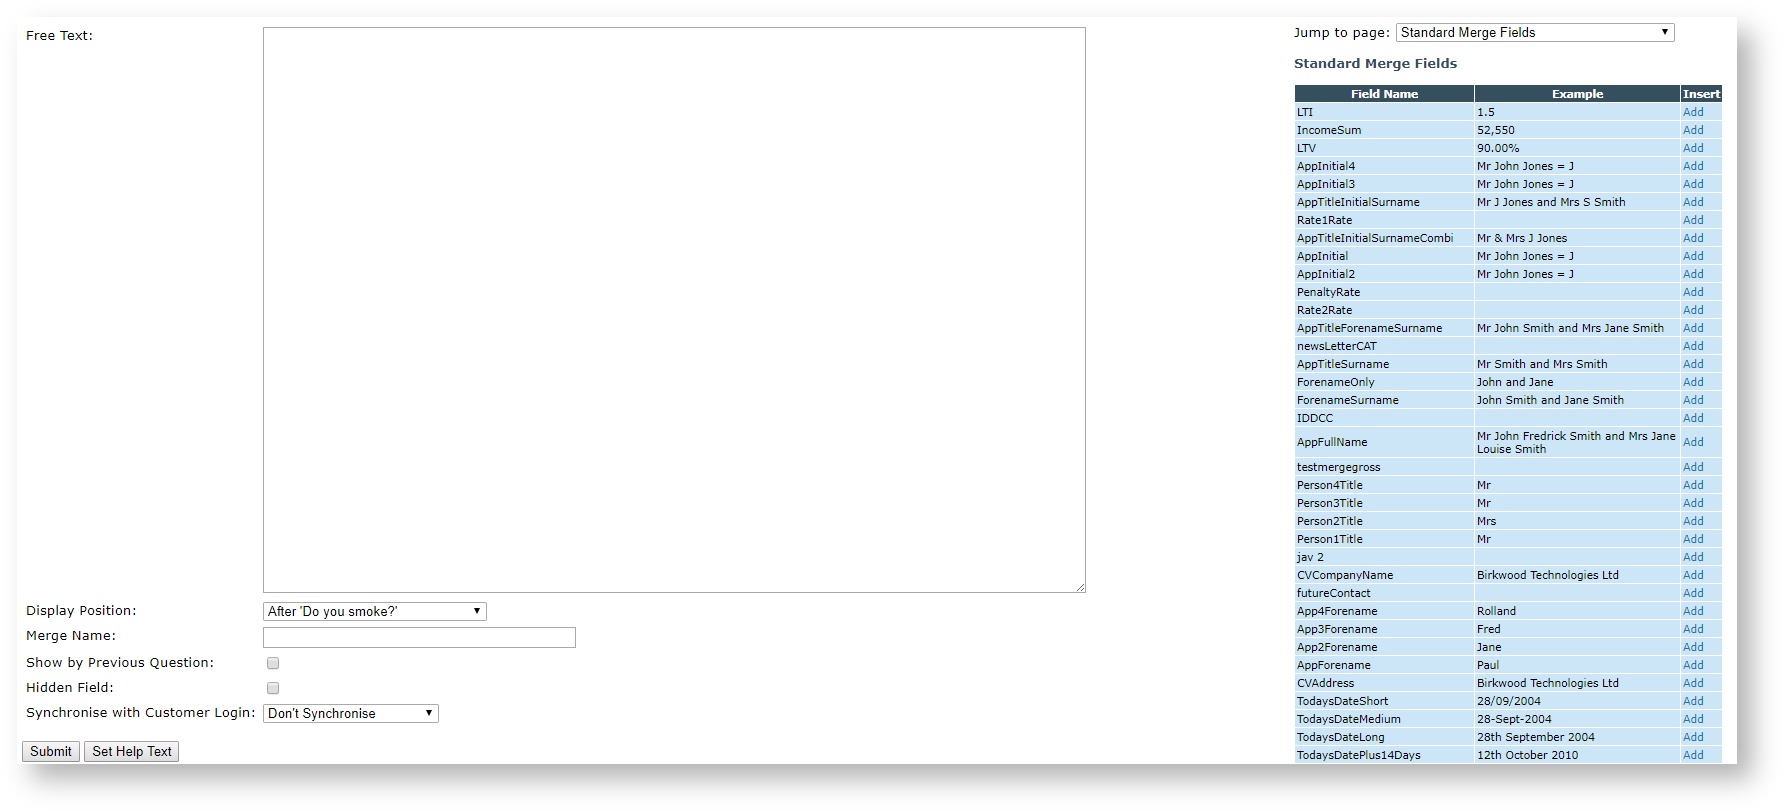
  • Free Text - this is an entry box for the text you wish to appear for this question, you can use the options to the right of the page to select various merge fields and place these into the free text box by clicking the 'add' link. Merge fields are useful if you wish to pull some information from the case into this informative text question that you are creating.
  • Display Position - determines the order in which this question will appear amongst the other questions in the current section
  • Merge name - A unique placeholder for the answer to this question. A merge field can be placed into a document template, so that the answer to this question can be pulled into your letter when you produce it against a case
  • Show by Previous question - specifies if this question should appear on the same line as the question that precedes it:
  • Hidden Field - Enable this question to be hidden when the fact-find page loads
  • Synchronise with customer login - If you have the customer portal on your package*, then you can enable this question so that it will be visible to your customers when they log in to their portal profile


Column
width60%


Expand
titleDrop down or Radio Group


Section


Column
  • Question Text - This is the name of the question you are adding to the current section
  • Display position - determines the order in which this question appears within the current section amongst the other questions in this section
  • Question Type - There are two options here
        • Dropdown:

        • Radio Group:

  • Question ID - (To be used in conjunction with the option IDs below). An identifier that maps this question to another question. The question ID is used to swap answers between two questions if the order of the applicants is changed i.e. applicant 1 is swapped with applicant 2, this will then swap any matching field answers using the question ID.
  • Mandatory Value - specify here if you want to make this field mandatory
  • Show by Previous question - specifies if this question should appear on the same line as the question that precedes it:
  • Hidden Field - Enable this question to be hidden when the fact-find page loads
  • Synchronise with customer login - If you have the customer portal on your package*, then you can enable this question so that it will be visible to your customers when they log in to their portal profile
  • Includes/Excludes sections in documents - If enabled you can choose to setup section tags against each option you define for this question.

    Expand
    titleWhat are section tags?


    Info
    titleWhat are section tags?

    Section tags are identifiers that you can use to wrap around text within your documents for example if your question has yes or no options as it's available answers and you setup two section tags <<quesitonYes>> and <<questionNo>>. Then if you choose No for this question then "Example text 2" will appear in your document when producing it against a case.

    Code Block
    <<questionYes>>
    Example text 1
    <</questionYes>>
    
    
    <<questionNo>>
    Example text 2
    <</questionNo>>

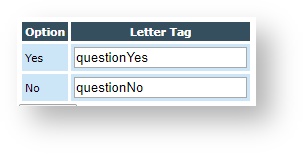
    To setup a section tag, check the box and then click the Set Section Tags button that appears (see below)


    On the page that appears simply set your section tags against each option (see below).

    Tip

    Try to make your section tags unique and identifiable for example a question about dependants might have options such as 0,1,2,3 etc. in this scenario you may choose section tags such as dependents0, dependants1FF, dependents2FF, dependents3FF etc.

    Remember not to include spaces in your section tags.

    Once you have finished making your selections simply click the submit button at the bottom of the page


  • Answer Options - There are multiple options here

          • Sequence number - Determines the order in which the question options appear amongst one another
          • Answer Text - Here is where you set your options for example Yes, no, maybe or 1,2 3 etc.
          • Option ID - to be used in conjunction with the question ID as mentioned above.


Column
width60%


Expand
titleSingle Checkbox


Section


Column
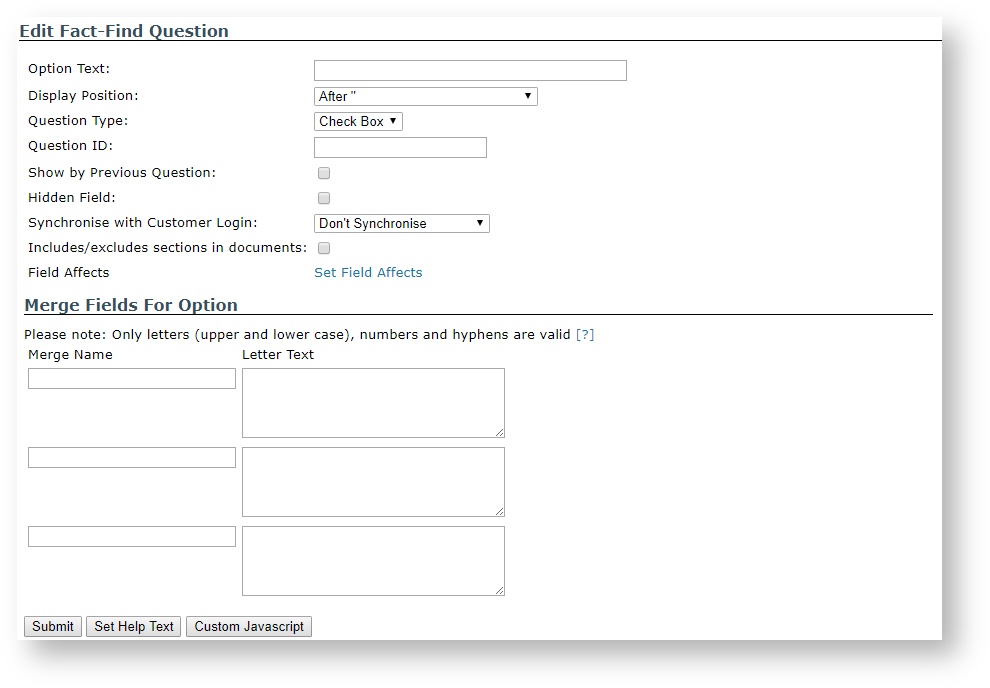
  • Option Text - This is the name of the question you are adding to the current section
  • Display position - determines the order in which this question appears within the current section amongst the other questions in this section
  • Question ID - (To be used in conjunction with the option IDs below). An identifier that maps this question to another question. The question ID is used to swap answers between two questions if the order of the applicants is changed i.e. applicant 1 is swapped with applicant 2, this will then swap any matching field answers using the question ID.
  • Mandatory Value - specify here if you want to make this field mandatory
  • Show by Previous question - specifies if this question should appear on the same line as the question that precedes it:
  • Hidden Field - Enable this question to be hidden when the fact-find page loads
  • Synchronise with customer login - If you have the customer portal on your package*, then you can enable this question so that it will be visible to your customers when they log in to their portal profile
  • Includes/Excludes sections in documents - If enabled you can choose to setup section tags against each option you define for this question.

    Expand
    titleWhat are section tags?


    Info
    titleWhat are section tags?

    Section tags are identifiers that you can use to wrap around text within your documents for example if your question has yes or no options as it's available answers and you setup two section tags <<quesitonYes>> and <<questionNo>>. Then if you choose No for this question then "Example text 2" will appear in your document when producing it against a case.

    Code Block
    <<questionYes>>
    Example text 1
    <</questionYes>>
    
    
    <<questionNo>>
    Example text 2
    <</questionNo>>

    To setup a section tag, check the box and then click the Set Section Tags button that appears (see below)


    On the page that appears simply set your section tags against each option (see below).

    Tip

    Try to make your section tags unique and identifiable for example a question about dependants might have options such as 0,1,2,3 etc. in this scenario you may choose section tags such as dependents0, dependants1FF, dependents2FF, dependents3FF etc.

    Remember not to include spaces in your section tags.

    Once you have finished making your selections simply click the submit button at the bottom of the page


  • Field Affects - Here you can set what happens if a user checks this answer on. for example if the user checks the answer on then you may want another question to show or hide further down the fact-find.
  • Merge Fields For options - here you can specify multiple merge field placeholders for this question. The merge fields you specify here can be included in a document template and will display depending on whether this checkbox question is checked.


Column
width60%


Expand
titleLinked Dropdown list


Section


Column
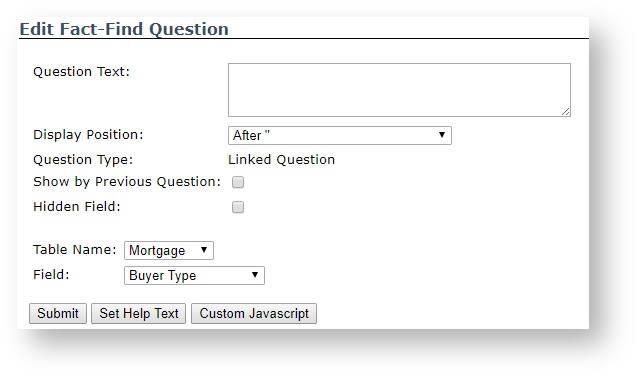
  • Question Text - This is the name of the question you are adding to the current section
  • Display position - determines the order in which this question appears within the current section amongst the other questions in this section
  • Show by Previous question - specifies if this question should appear on the same line as the question that precedes it:
  • Hidden Field - Enable this question to be hidden when the fact-find page loads
  • Table name - this is the area of the system you are trying to link this question to
  • Field - this is the specific field in the above area that you are linking this question to.


Column
width60%


Once you have finished setting up your desired question type click the Submit button to create the question.


Table of Contents