Creating Letter Templates
- Adam Evans
- Roly Birkwood
- Stephen Tinnion
Introduction
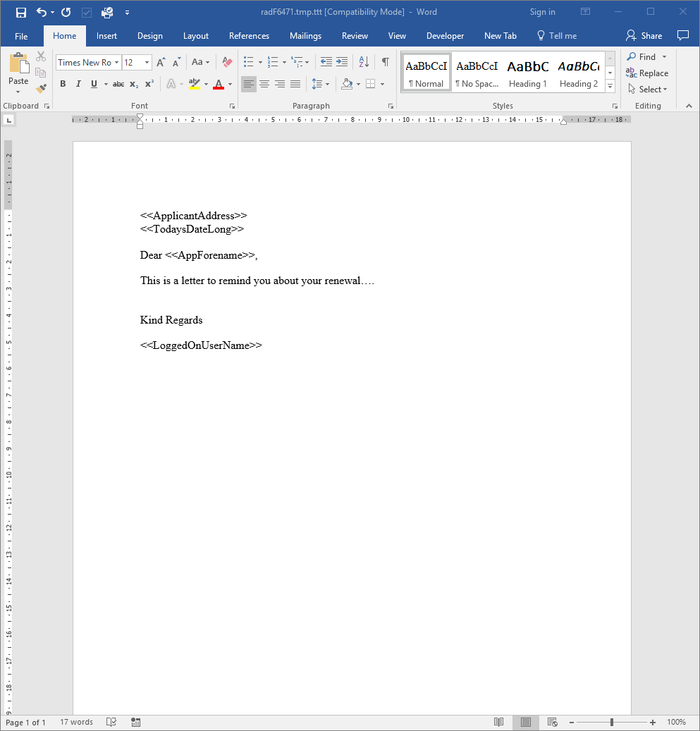
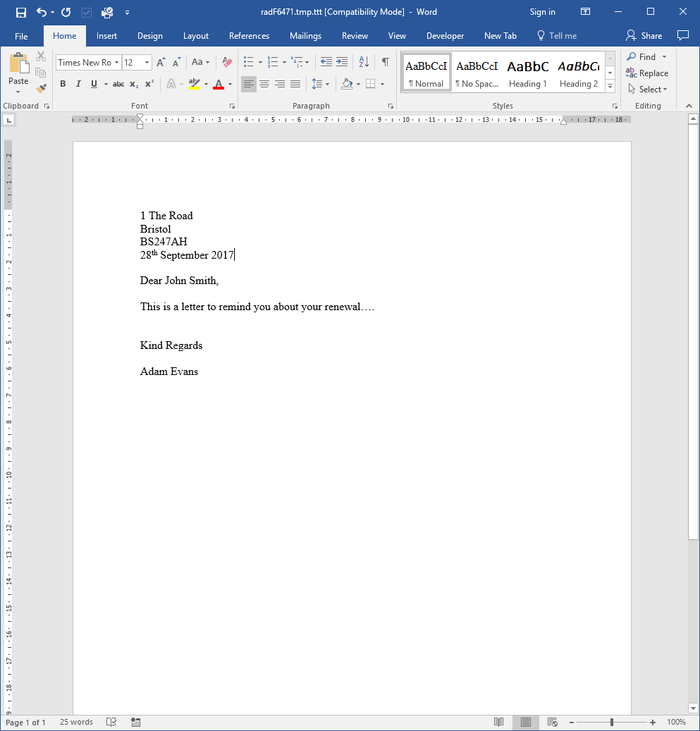
This article will cover everything you need to know to setup a letter template within the ekeeper system. A letter template is a power tool that enables you to have a standard suite of letters which will automatically populate information from your products. See the two screenshots below, a template, whilst editing, as appears as the first screenshot on the left. The right hand screenshot shows you how this letter may look when produced against a product.
Step 1 - Finding your exiting letter templates
As with most customisation in your eKeeper system, letter templates are created and edited via the Maintenance screen.
To begin Head to the System settings menu (via the top navigation bar (figure 1)
![]()
Figure 1 - Navigation Bar
Next look for the Document Production, Telephony & Texting section and click the Document Templates link (See Right and figure - 2 below)
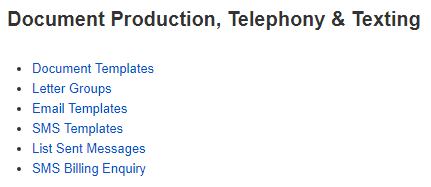
Figure 2 - Document Product, Telephony & Texting
You should now see a list of existing templates (figure 4)
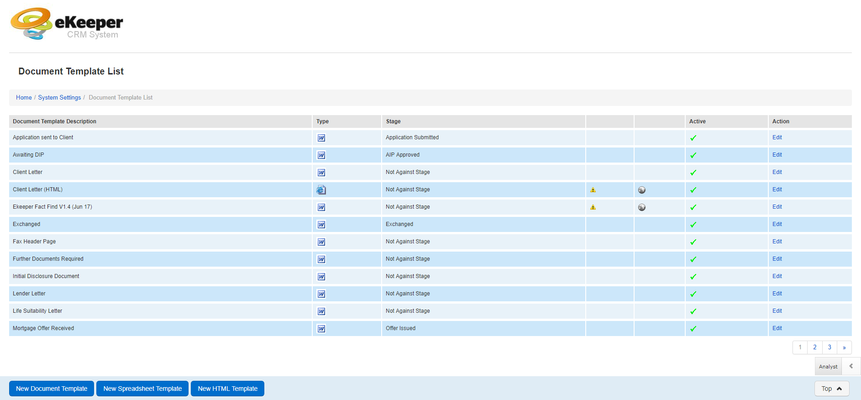
Figure 4 - Document Template list
-A video guide to editing your document templates in eKeeper CRM
Step 2 - Creating a new letter template
From the document template list page, find the bottom navigation bar and click the 'New Document Template' button.
![]()
Figure 5 - Document Template list page, bottom navigation bar
Setting up your letter template
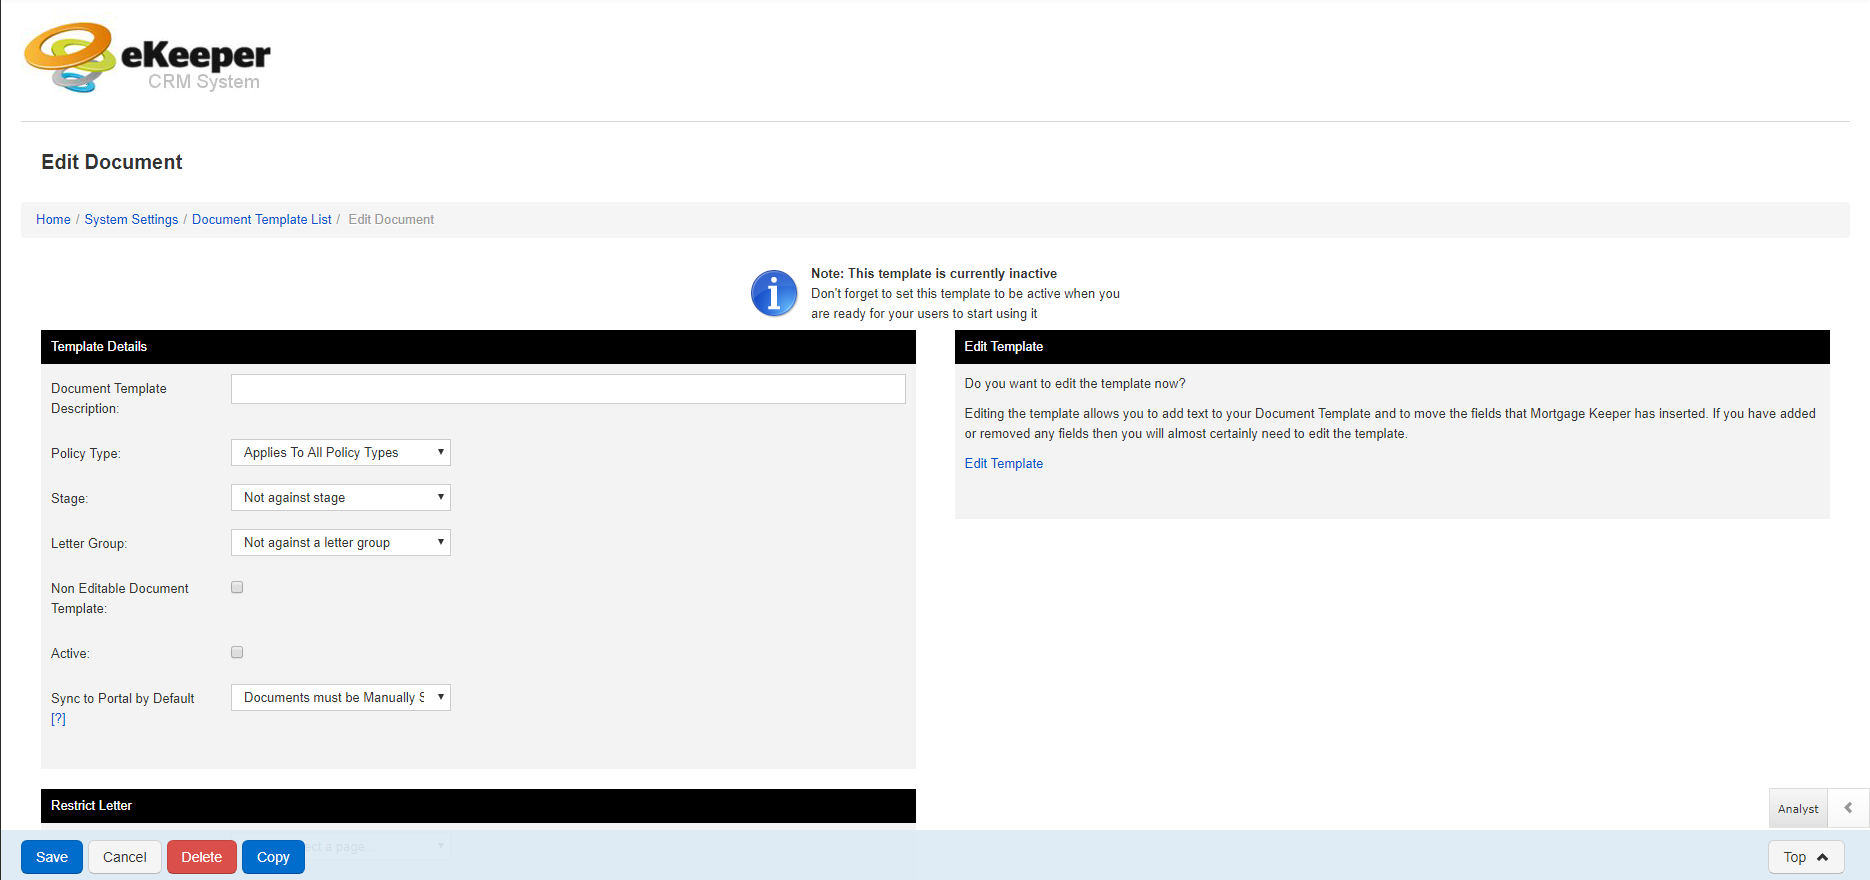
You should now see the Document template setup page (see right)
The first thing to do is to setup the name of your letter and to decide when this letter will be available to your users.
This can be done via the template details panel (figure 6).
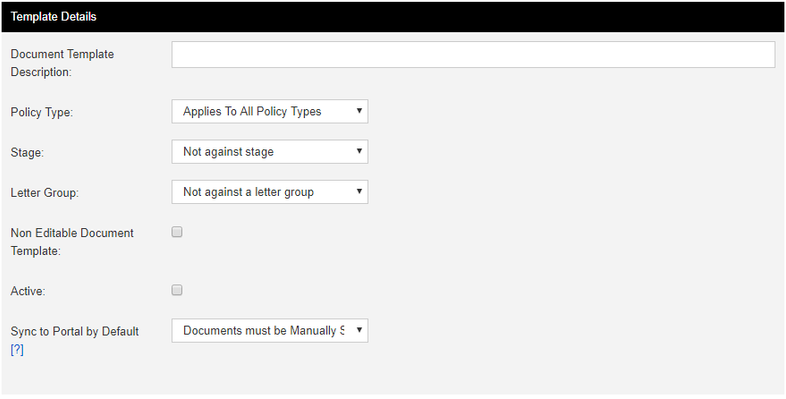
Figure 6 - Template setup page
Restricting letter production
You can restrict when your letter template can be produced against your products. To do this scroll down past the Template Details panel and look for the Restrict letter panel. This restriction is based on an answer to a question within your electronic fact-find. If the answer to your chosen question on your product's fact-find matches this panel then your letter template will become available for users to produce within that product.
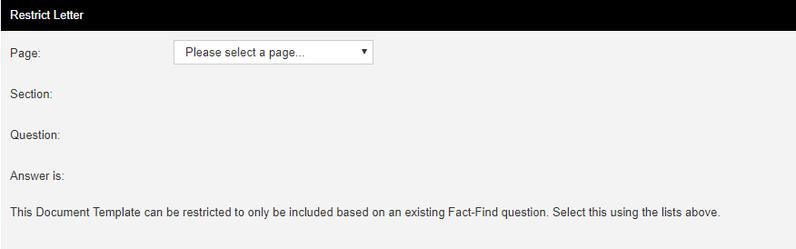
Figure 7 - Restrict letter panel
Selecting Merge fields
What are merge fields?
Merge fields are placeholders for information. You can place merge fields into your letter templates, these are then replaced by ekeeper when the letter is produced on a product. For example if you have a merge field called <<app1Forename>> then this will be replaced by the 1st applicant's forename, when the letter is produced on a case.
Adding merge fields to your template
To begin adding merge fields, scroll down on the letter template setup page until you see three panels titled Add General Merge fields, Add Fact-find Merge fields, and Add Product Merge fields. (figure 8) below:

Figure 8 - Merge Field Panels
Each of the clickable links in the panels above (figure 8) opens a menu that lists all of the relevant merge fields. You will see a page similar to figure 9 below. The page displays a number of tables with rows that representing the relevant merge fields. You will find that typically the row will show the name of the merge field, a description of the information will populate into it when producing a letter, and an example of how this will look on in your produced letter.
To use this page simply check the boxes against the merge fields you wish to use in your letter and once you're finished click the 'submit' button (on the bottom navigation bar).
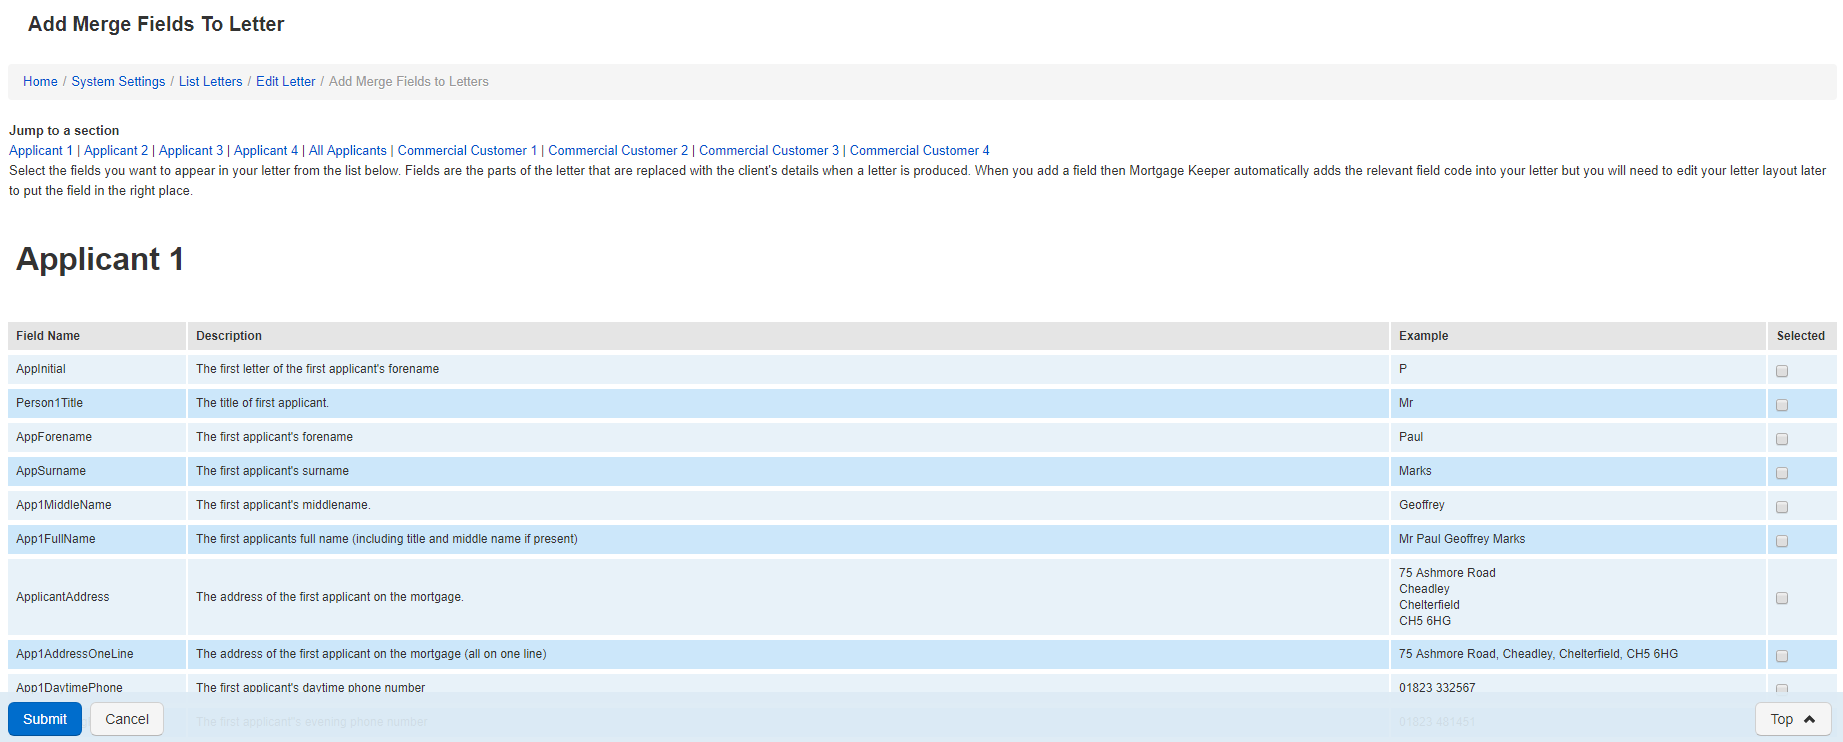
Figure 9 - Merge field example menu.
Document template Setup page
- Document Template Description - Enter the name of you letter here.
- Policy Type - Select the policy that this letter template is applicable to.
- Stage - If you would like this letter template to be produced at a particular point in your workflow (business summary) then select the name of the stage in this field
- Letter Group - Letter groups (setup via the system settings menu) enable you to group similar letters together. This makes them easier to find when producing them if you have a large number of templates to choose from in your system.
- Non Editable Document Template - If you do not want users to be able to edit the content of this letter when it is produced on a product then check this box.
- Active - Use this to check turn this tempalte on or off. If you turn this off then this letter template will not be available to your users.
- Sync to Portal by default - This allows you to set this letter template to be available to your portal users. You can set this to automatically sync this letter template to the portal, to be manually synced after production or disable the portal sync. (additional purchase required).
- Page - This is the page within your fact-find that a question is located
- Section - This is the section that your chosen question is located within
- Question - This is your chosen question that you are looking to restict your letter against.
- Answer is - This is the answer that your question must be set to before this letter template will become available to be produced on your product.
Note
Merge fields are predefined before you arrive at this page. There are many merge fields to choose from and the information can come from many different places within the system for example applicant details such as names, addresses and phone numbers; Loan amount from the case; and custom fields that you create within the editable fact-find; to name a few.
- General Merge fields - The links in this panel allow you to add
- Applicant information - This provides applicant details such as their name, contact details, date of birth etc.
- Recipient - These merge fields intelligently populate information depending on who the letter is produced against e.g. if you produce the document against a lender, then the lender's information is populated.
- Date and users - This allows you to add todays date and also logged on user information e.g. the user's name, email address etc.
- Participant - Here you can add in contact information relevant to various participant types e.g. introducer, solicitor etc.
- Tick-list - Here you can add in information based on requested supporting documentation on your products e.g. the date when the name id was requested.
- Add Fact-find Fields - The links in this panel represent the various fact-find structures that you currently have active in your system. When you click the relevant fact-find link, you will be able to navigate the various pages in your fact-find to find
- Product Merge Fields - The links within this panel can be used to select merge fields relevant to the various merge fields
Tip
You can come back later and select more merge fields to your letter template. This can be done as many times as you wish.
Step 3 - Editing Letter template content
Now that you have setup your letter (step 1) and chosen the merge fields you wish to use in your letter (step 2). You can now begin editing the content of your letter template. To do this find the Edit Template panel (figure 10) on the letter setup page and click the edit template link.
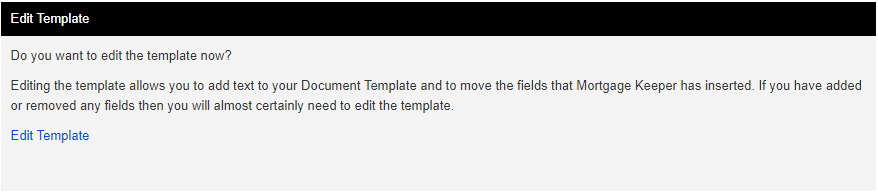
Figure 10 - Edit Template Panel
Once you have clicked edit template your letter will begin to load (figure 11), If the document fails to load figure 11 will change to inform you of the failure reasons.
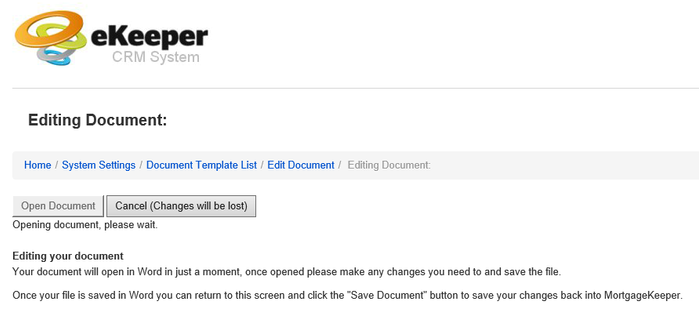
Figure 11 - Document Opening
Moving and styling merge fields
When the document has successfully loaded you should find a blank word document has appeared (figure 12). Note that the document may have opened behind any active windows you have on your machine so please check the task bar for the Microsoft word icon. Note you should see any merge fields you selected within the document. Merge fields appear with their identifier name surrounded by two chevrons at either end.
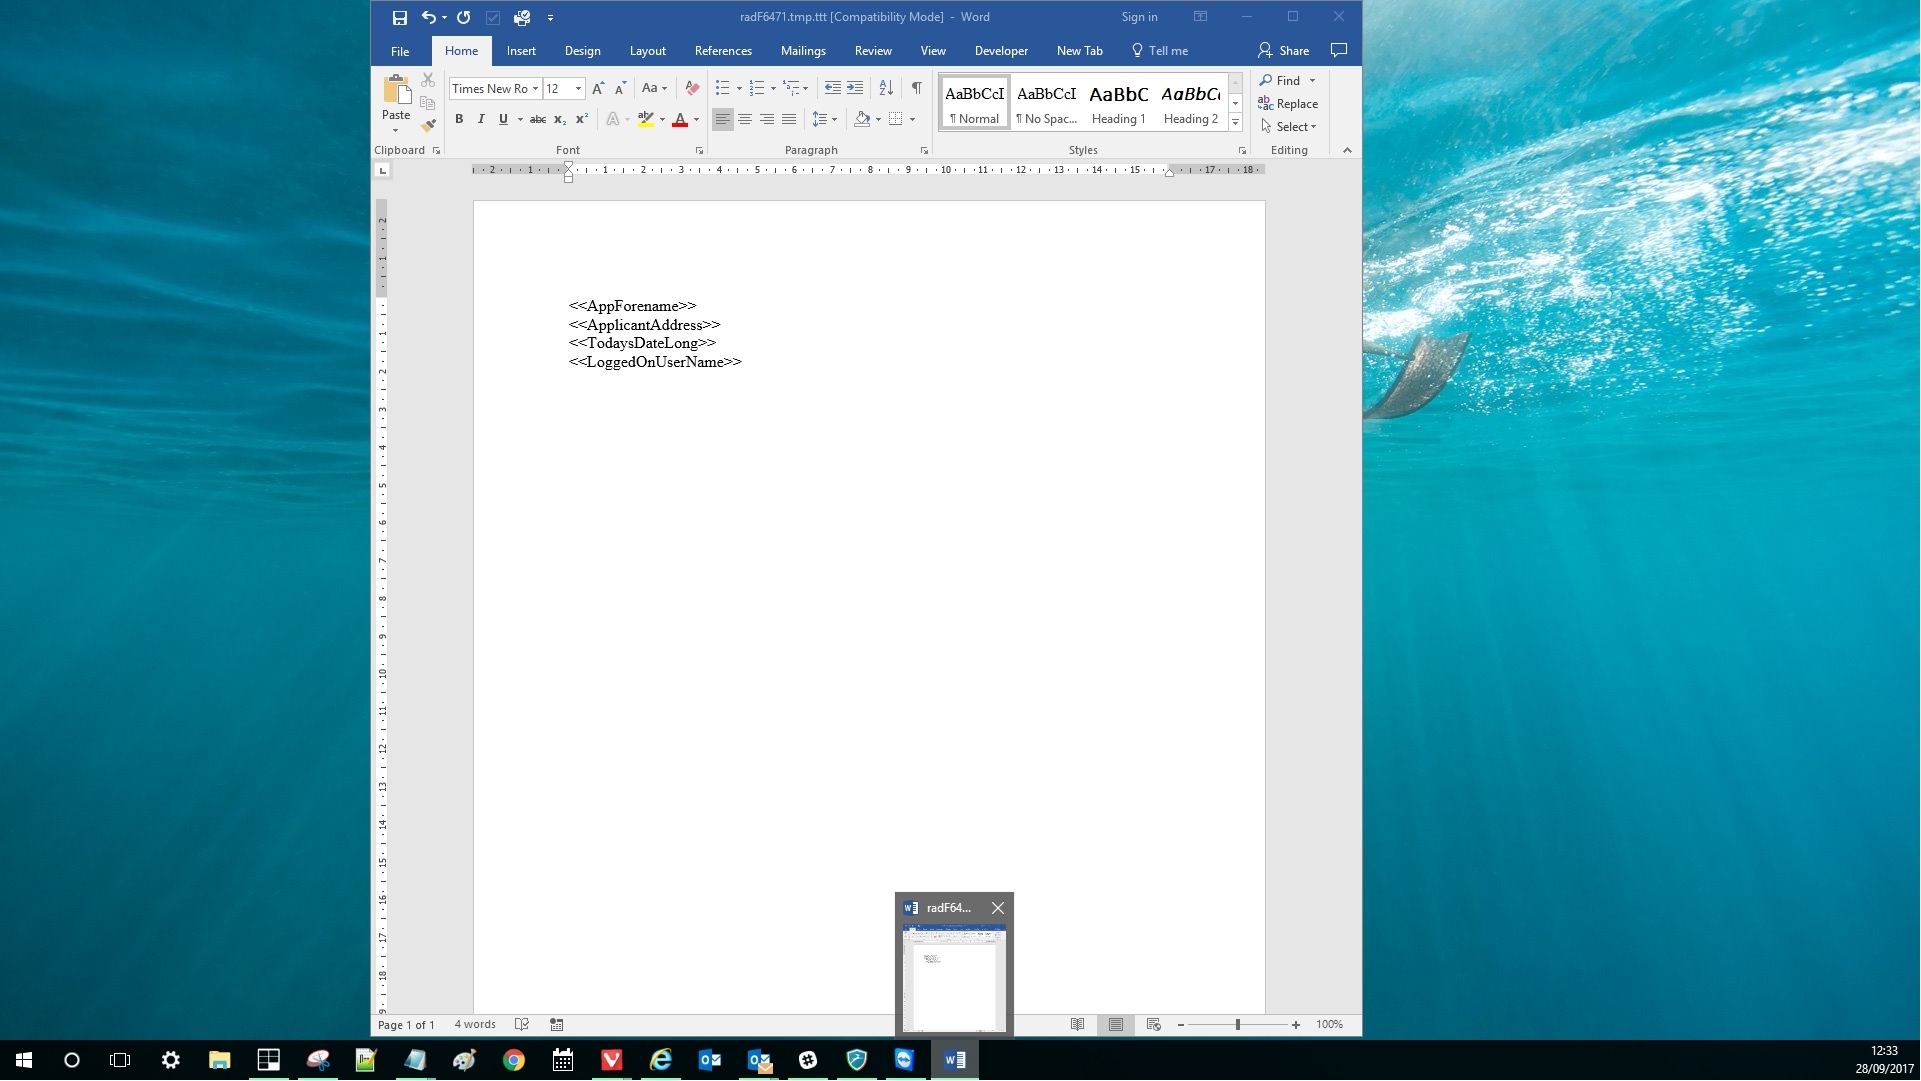 Figure 12 - Letter template opened in Microsoft word
Composing letter content
Now that you know how to move and style your merge fields the next thing to do is add content to your letter. This is the same process as editing a normal word document outside of ekeeper. All you need to do is type your content and then move your merge fields to where you want them to appear. Remember that the merge fields will be replaced with application/case specific information when you produce your letter against a product later on.
Figure 13- Composed letter template
Saving your letter template
Now that you have finished composing your letter you need to save the template back into the ekeeper system. It is important to note that you have been editing a copy of the letter, locally on your machine up until now. To save the document click the close button in the top right hand corner of the Microsoft word application.
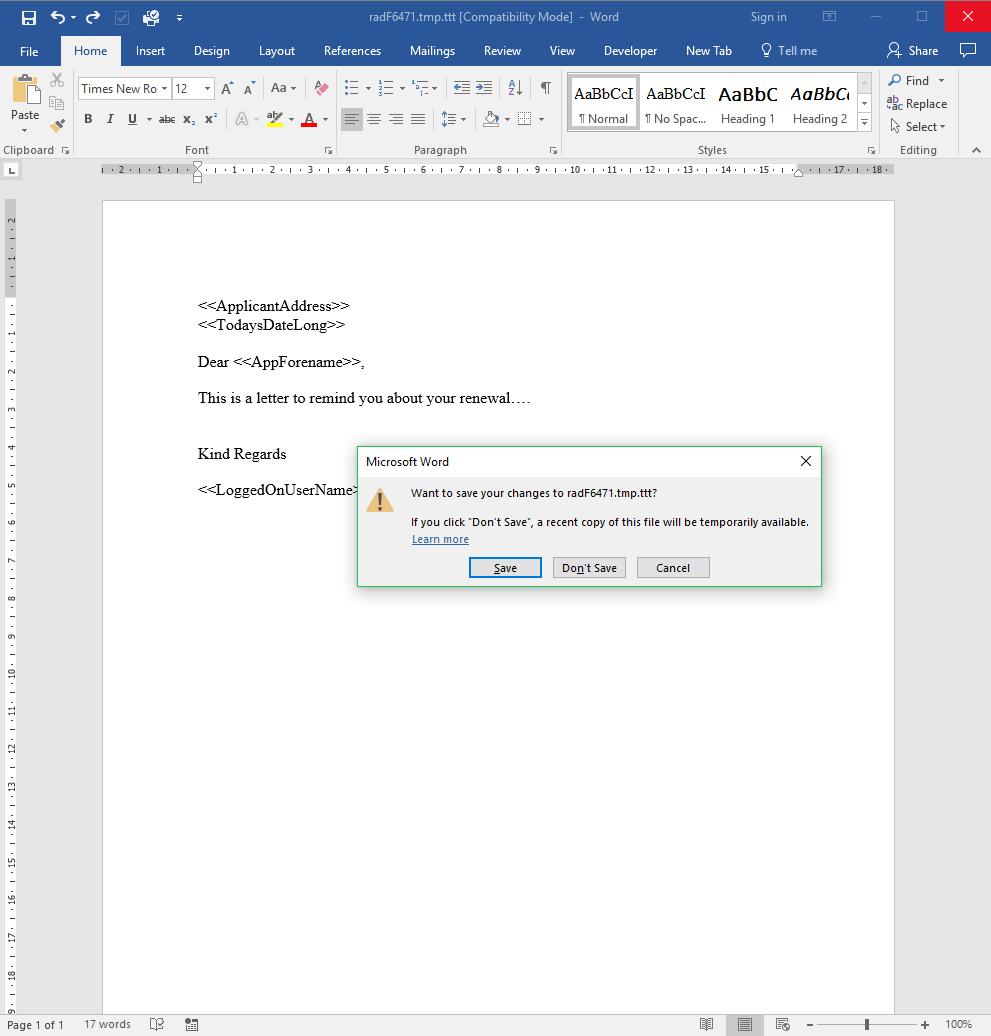
Figure 14 - Saving a letter template
Now that you have closed the word application and saved the file, navigate back to ekeeper in your browser (figure 15) and click save document button.
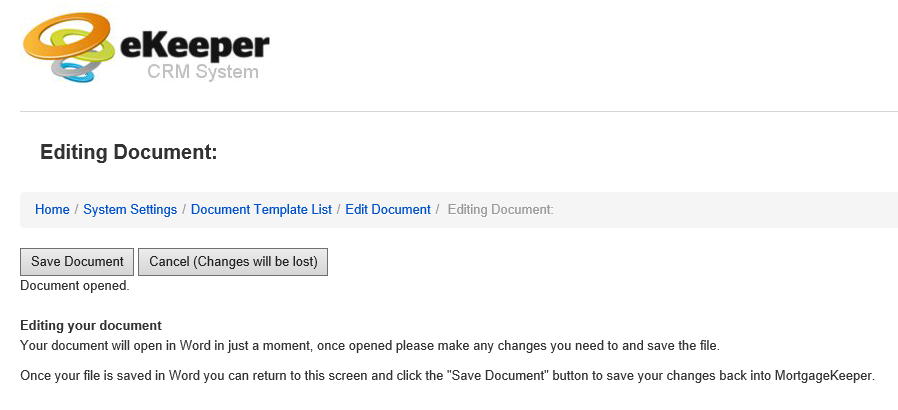
Figure 15 - ekeeper - save document page
You should now see the letter template setup page (Figure 16)
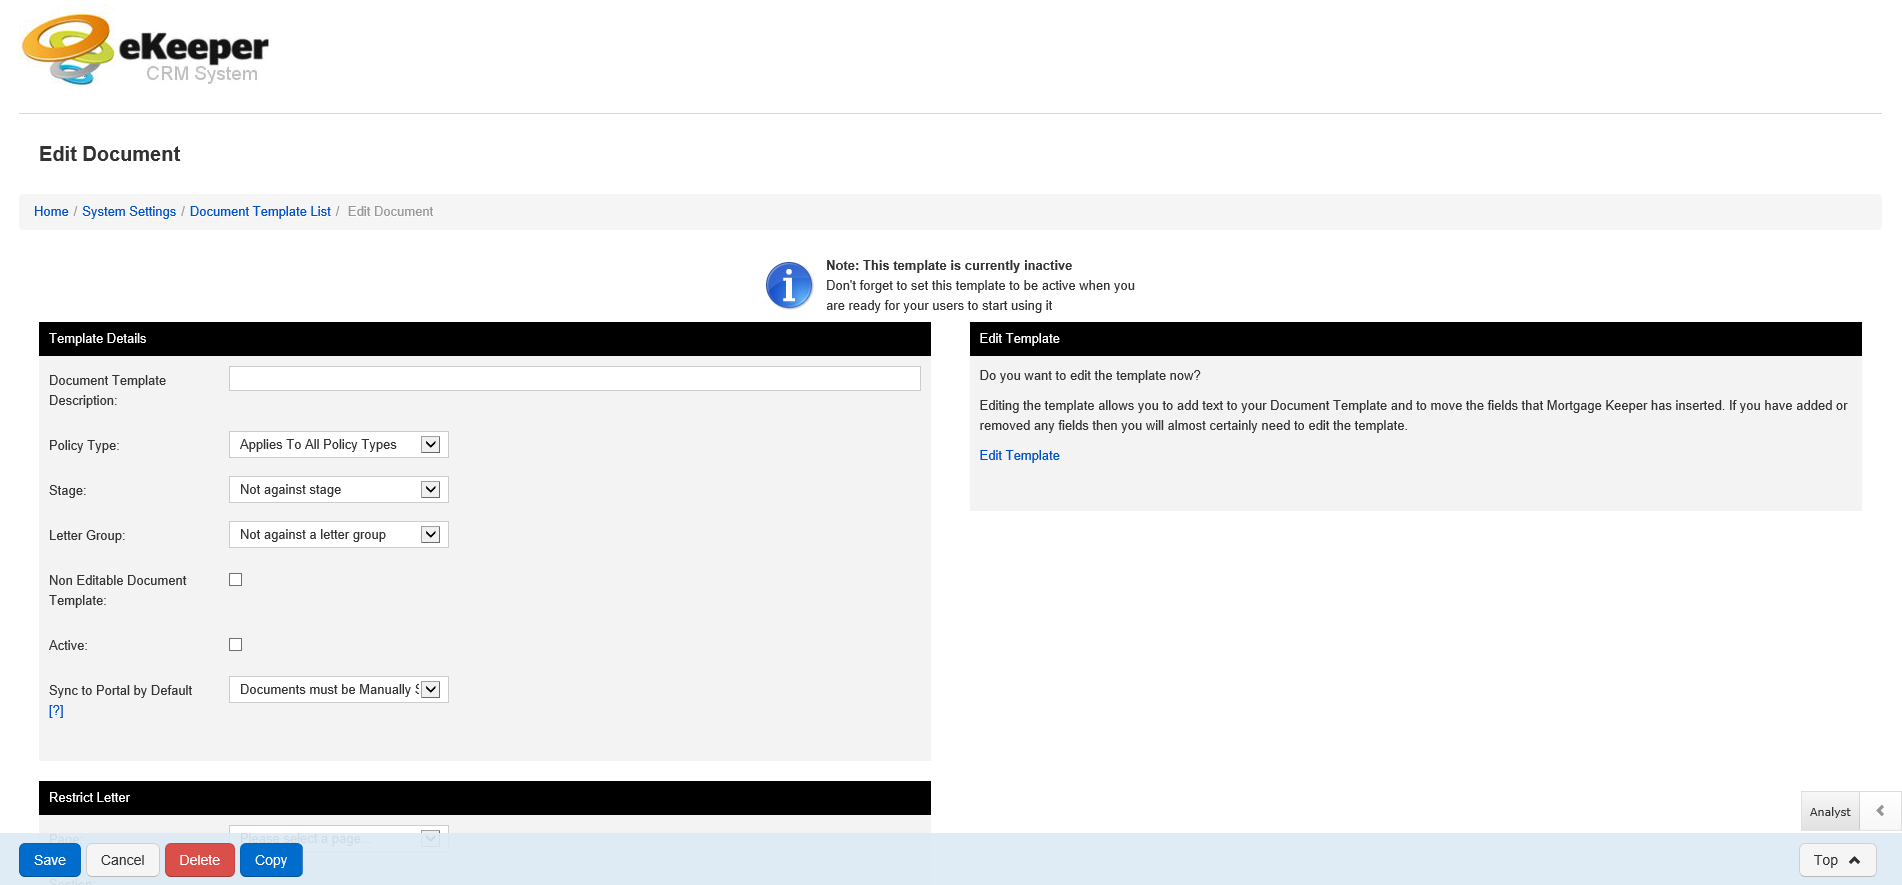
Figure 16 - Letter template setup page
Note
If you are having difficulty opening letters check the following:
- You have a valid licensed copy of Microsoft word installed on your machine (2012 or newer)
- You are accessing the eKeeper system via Internet Explorer

- Your browser has been configured to interface with Microsoft word on your machine (see setup guide)
Important
it is important that you leave this page (figure 12) open and do not refresh this page during the letter editing process. Doing so will prevent ekeeper from saving the document.
Tip
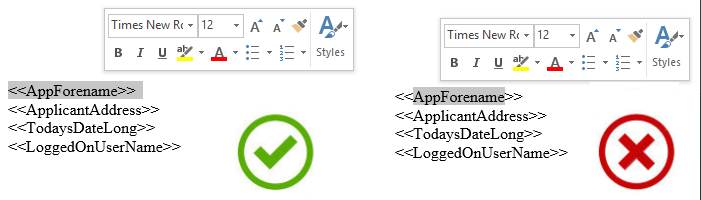
When making changes to your merge fields you need to make your changes to the entire merge field including the chevrons at either end. This applies to
- Moving the merge field to a different location within the document template
- Changing the font of the merge field
- Changing the size and colour of the merge field.
For example if you wanted to change the font size for the data populated into the merge field then you would select your merge field as follows:
Important
It is important to note save the document to any other location, this can happen if you click 'file > save' or 'file > save as', this is why we recommend to simply close the word application using the close button in the top right corner of the Microsoft word application
Note
The saving process may take some time depending on your internet connection and the size of the letter. Please be patient and avoid closing or refreshing the page. Once the page has finished processing it will redirect to the letter setup page automatically.